Archive for the ‘Future Professionals’ category

Continuing with the Maze Game in Flash: Beat the Clock!

February 10th, 2010

We’re going to add a simple timer to our maze game that we’ve been working on. (If you’ve missed a few sessions, start here.)

We want the timer to start at 1000 and count down to the player’s imminent doom.

To set up the initial value for the timer, let’s create a variable called scarytimer.
var scarytimer:Number=1000;

Put that code at the very top, outside of any functions. If a variable is defined in a function, other functions will see it as undefined. So, at the top of the AcionScript, type in:
var scarytimer:Number=1000;
right above where you see
var tiles:Object = new Object({width:52, height:26});

The player will start with 1000 loops to be able to get to tile101, tile101 being our special tile from last time.

Now we need the player’s doom.

In the onEnterFrame function, we need to subtract from scarytimer each time the game loops in a frame.

Way back in the olden days when I programmed stone tablets for pterodactyls, we would write scarytimer=scarytimer-1 to subtract gradually from the variable with each loop.

ActionScript has simplified it with the code:
scarytimer--;
The two minuses tell ActionScript to subtract one increment from the variable.

Put scarytimer--; right above where you see input();

Variables get tricky when trying to determine what value they have. Run a trace on the variable to have the computer tell you what value scarytimer has.

scarytimer--;
trace(scarytimer);

Now the code will decrease scarytimer and then spit out its value to you.

Run your file right now to make sure your variable works. If it doesn’t, everything else will get nasty quickly.

Continuing in Isometrics: A hero stepping on a tile

February 1st, 2010

We started with this great game engine and we edited the arrays to add walls at different locations on the map. This week we’re going to add a custom floor tile that:

  • Checks to see if the hero is standing on the tile.
  • If the hero is on the tile, sends the entire Flash timeline to the next frame.

First let’s make sure we know how to recognize the hero stepping on a tile.

  1. Open up your project file from last week. (Remember: the original file can be found here if you were gone.)
  2. Open up the project’s library.
  3. Right-click/CTRL+click on the ’tile100′ movie clip in the library. Choose ‘Duplicate’.
  4. Name it ’tile101′. Make sure to click the checkbox next to Linkage: Export for ActionScript.
  5. Double-click the ’tile101′ movie clip to edit it. Double-click the square and select a new color from the paintbucket for it.
  6. Click on Scene 1 to go back to the main timeline.
  7. Click on the frame with all the ActionScript in it. To edit the ActionScript, click on the arrow in the frame’s Properties window.
  8. Look for the code that reads:

    _root.onEnterFrame = function():Void
    {
    input(); // Handle keyboard movement
    return;

    };
    Let’s add a message that pops up, showing that the exit was stepped on. We’ll use the trace function for that:
    _root.onEnterFrame = function():Void
    {
    input(); // Handle keyboard movement
    if(canvas.map[hero.y][hero.x] == 101) trace("Exit");
    return;

    };

    A message should pop up in the debugger window with the word “Exit” showing up while you step on the tile.

    Now that we can tell if the tile is being stepped on, see if you can figure out how to send the hero to a new map.

Isometric Game Engine

January 26th, 2010

Isometric perspective is a way to use 2D images to create a 3D environment. Flash normally operates in 2D images; Chris Lindsey created a game engine in Flash to represent a 3D environment. The engine does require ActionScript 3, though, so it won’t run properly in ActionScript 2.

A game engine is not a game in itself- it is the power behind the game. Programmers will design an engine to run their video game and then license that engine to other game developers. Here’s a list of some of the current game engines out there.

Things to look at in this game engine:

  1. There are no movie clips on the stage to begin with. The code places the movie clips onto the stage when you test the movie/make the .SWF file.
  2. All of the code is in just one frame. You don’t have to search all over for it – this is really appreciated.
  3. There’s a giant array of numbers.
    Photobucket
    This is your map. If it says ‘200’, that’s a wall piece that gets placed. If it says ‘100’, that’s a floor piece.
    Photobucket

Save a copy of the .FLA file so you have the original and then one to work with. Try editing the ‘hero’ movie clip. Draw your artwork on a new layer inside the movie clip. You can then delete the original box image layer. To help you out, you can turn the box layer into an outline by clicking on the colored box on the layer (in this picture it’s yellow).
Photobucket

Once you get used to how the artwork is set up, try expanding the map by adding a new line of 100s and 200s in the ActionScript.

Click on the game to play it. Use the arrow keys to move your character around.

The .FLA file with all of the code can be found by clicking here.

Republic of Bacon

January 25th, 2010

In the Future Professionals club, we’ve looked at using Flash for animations. We’ll examine ActionScript code to make Flash games.

But something we don’t normally focus on is using Flash for website design. It makes for some fun interface, but be warned: not every device supports Flash.

Check out the new site The Republic of Bacon for a great example of a site designed in Flash (and for a Bacon Rice Krispies Treat recipe).

Creating a Motion Guide in Flash

January 20th, 2010

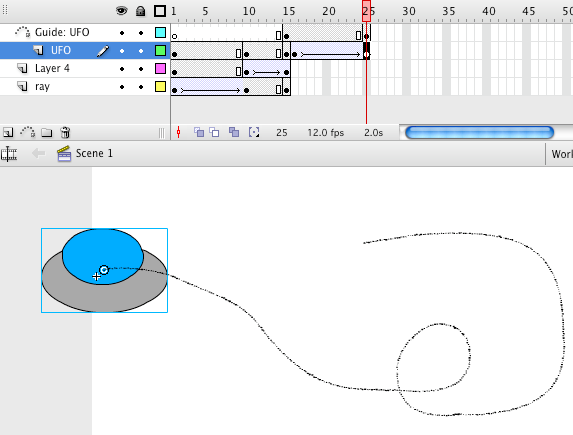
Symbols in Flash can use a motion guide to designate a more specific route, with the precision of the pencil tool, for the animation to follow (so you don’t have to make so many adjustments frame-by-frame).

Let’s add a motion guide to our UFO from last week. Click here if you weren’t here last week.

Your project will look something like this when you’re done:
Photobucket

After your last frame of the UFO, let’s have the UFO fly off.

  1. Click on the UFO in the last frame of the timeline. (If the last frame is part of a motion tween already, add a new keyframe right after it).
  2. Next to the Create a New Layer button there’s a box with a dotted line next to it. Click on that icon.
  3. Click on the new layer. Make sure it’s the same frame in the timeline as the end of your UFO.
  4. Insert a new keyframe in the Guide layer.
  5. On that keyframe, draw your new path with the pencil tool.
  6. Move your UFO symbol to snap to the beginning of the path you just created.
  7. Decide how long you want the UFO animation to be. Create a keyframe on the UFO layer a couple of frames down the timeline (more frames means the UFO goes slower on the path).
  8. Create a keyframe on the Guide layer the same number of frames down the timeline that you made the UFO.
  9. On the last keyframe, move your UFO to the end of the path, snapping the UFO to the line.
  10. Highlight the UFO frames from the start of its motion to the last keyframe. CTRL+Click (right click) on the highlighted frames. Create a Motion Tween.
  11. Test your movie.

Creating a fading movie object in Flash CS3

January 13th, 2010

Today’s Future Professionals meeting is going to involve a cow being abducted by a UFO.

  1. Create a Flash ActionScript 3 file.
  2. Created a movie clip of a UFO.
    Photobucket
  3. Create a new layer and put a movie clip of a teleporting ray on that new layer.
    Photobucket
  4. Drag the ray layer underneath the UFO layer to make the ray underneath the UFO.
  5. Insert a keyframe on frame 10 of the two layers.
  6. Click on frame 1 of the ray layer.
  7. Click on the ray movie clip.
  8. In the movie clip properties window, where it says ‘Color: None’, change it to ‘Alpha’.
    Photobucket
  9. Drag the Alpha down to 0%.
  10. Select all of the frames on the ray layer.
  11. CTRL-click/right-click on the highlighted frames in the timeline. Choose ‘Create Motion Tween’.
    Photobucket
  12. Now it’s up to you to add a new layer, the cow layer, and do a motion tween to have it disappear inside the ship.

Aniboom

December 1st, 2009

I was working on another tech project that I’m sure you will see here later when I stumbled across Aniboom. Am I the only one who didn’t know about this site?

I work with the Future Professionals on how to use Flash. Aniboom is a great (free) resource to think through the animation process. It’s a webapp that has a pretty sophisticated file system. It even exports as an animated GIF, which was the most impressive part for me.

Like anything we do in Future Professionals, I like to have a demo.
Here is my animation that I created in four minutes:
M2.2
Yep. Pong.

Future Professionals: Intro to Photoshop

October 7th, 2009

For today’s club meeting, we’re going to be getting used to Photoshop. We’re going to keep it simple – copying from one image and pasting it onto another picture’s layer.

Here’s the background for your creation:
Photobucket

Use Photoshop’s lasso tool to draw around the picture you’re going to put in the courtyard. Use the crosshairs with an arrow to drag that selected picture onto our courtyard.

Did You Know? Video

July 30th, 2009

If you haven’t seen this video about globalization and a changing market, you should:

It’s an update from a presentation by Karl Fisch that he gave to his staff at Arapahoe High School. His informal citations for the stats are here. The update was done by Scott Mcleod, a professor at the University of Minnesota. I really relate to how quickly tech information changes during the course of a college study. My first two years we were doing C/C++ (and I used to read binary) but then the required languages switched because web development was really taking off.

Future Professionals games for this year

May 20th, 2009

Check out the games created by this year’s Future Professionals crew.

I set up a new area. You can get there by going to http://briangriggs.com/games.