Archive for March, 2009

Re-posting of ActionScript Tutorial

March 27th, 2009

Once you’ve mastered this, try out the Pong tutorial by the Flash Ninja Clan here.

(and for Future Professionals, but we’ve been working on this)

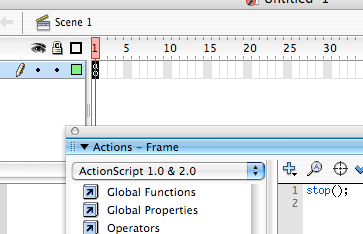
The first type of code that I like to introduce is “stop();”. Put this in the ActionScript for the first frame. Test the movie. Instead of moving on through the frames, it stops in frame 1. How exciting.

Let’s animate a figure.
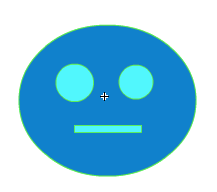
circleman
This is circleman. He is a very complex character with artwork that took me hours to draw.

To be able to easily reuse circleman, instead of drawing him on the stage, I made him a separate movie clip in the Flash file’s library. That way I don’t have to spend hours re-drawing him.

Right now he’s kindof boring in his new layer on frame 1, especially since the “stop();” command doesn’t move the animation anywhere. But for this movie, all of the fun will happen in one frame.

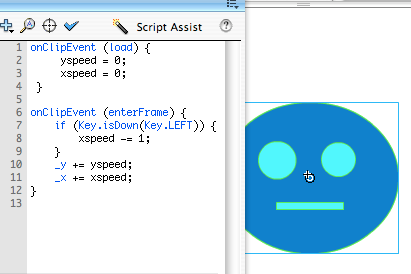
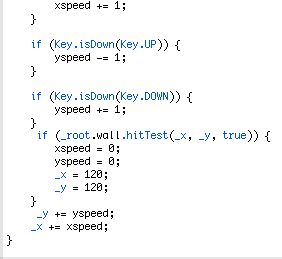
Make sure that circleman is selected, click on his ActionScript button, and type in the code that you see in the picture:
Move Left code

The onClipEvent(load) is a one time thing when that movie clip shows up in the frame the first time around. You’re setting up the initial values of the speed.

The onClipEvent(enterFrame) is every time the frame loops. With the LEFT function, it’s making your xspeed value a negative one. Outside of the Key.isDown(Key.LEFT) function the _x and _y is being added to whatever your xspeed and yspeed values are. It will do this each time the frame loops (many times per second). This creates the constant motion. If you don’t like the constant motion, you could put the _x += xspeed; part inside the Key.isDown function to add the xspeed only when the key is down.

Remember: Brackets start and stop a function. Every time there’s an open bracket it has to close the function somewhere with a close bracket.

Back to the Key.isDown, the way we’ve got it set up, circleman moves left until he is stuck in the netherworld called “Offscreen” with no hope of return. Add some UP, DOWN, and RIGHT Key.isDown functions.

Boundaries
Here’s where stuff gets crazy.

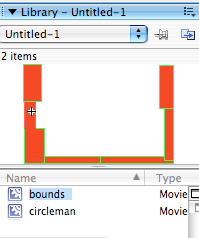
Create a movie called “bounds”.
bounds
This will be your environment/world/level.
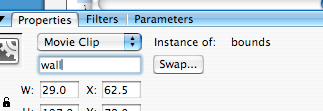
Put the movie bounds on the stage. Name its instance “wall”.
wall

In circleman’s ActionScript, add a hitTest after your Key.isDown code but before your _y+=yspeed; stuff.
hitTest
If the character hits the bounds, it stops and then moves to new x,y coordinates.

This ActionScript dictionary is officially your best friend.
Photoshop Contest #3: Anime Character

March 25th, 2009

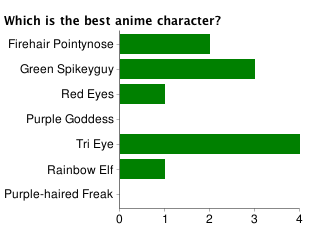
The Results:
picture-11

10th Grade Bleeds

March 23rd, 2009

image220

I’m excited. I just got in the mail today the advanced copy for the new Vlad Tod book, 10th Grade Bleeds by Heather Brewer. Just gotta finish Max by James Patterson. It’s definitely better than Final Warning…

Judge a Girl by Her Cover

March 19th, 2009

Ally Carter’s new book has a finalized cover now:

Fun book, due out this June.
Check out more at Ally’s site.

Choose Your Own Adventure is Back!

March 11th, 2009


Summers for me were spent grabbing armfuls of these books from the public library. I remember the Cave of Time, where if you went up a tunnel you went into the future and if you went down a tunnel you went into the past. My favorite was being stuck eight seconds in the future. I always died trying to cross the street, being hit by a car that didn’t exist yet. I’m sure Stephen Hawking must flip out at the pop science, but whatever.

Also of note was this space adventure. I remember always unleashing some horrible intergalactic plague.

Well, it’s good to see that the official brand is back.

Editing image size and alignment in pbwiki HTML

March 10th, 2009

This is for redfield.pbwiki.com.

When you add images to a pbwiki, it takes a little bit of HTML editing to format the image how you would like. In pbwiki, click on the Source button in your editor to view the HTML code.

Let’s use an image here and I’ll show you the different code to change the formatting.

The image:

If you were to view the HTML code for this image, it would look like:

What if we wanted to make the image bigger? I would add height and width code to my image HTML.


Notice the space from the URL and then the height=”300″ and width=”300″ code. Also, I chose 300 as a random number. Make the numbers smaller to shrink your image, larger to make your image pixels larger.

By adding in an align code, I can change how the words wrap around the text. Try adding in an align=”left” or align=”right” next to where you put the height and width code.

I’ve added some text and I will keep typing to see if the image will wrap around correctly using an align=”right” code. I started typing this after where I inserted the image. Below the red circle picture that I’ve got here I’ve put the source code so that you can see how I changed the image size and the alignment. Something to look for when you are searching the HTML source code is looking for a .gif, .jpg, or .png file to see where your images are at. I’ll keep typing and you can keep reading but you should probably just go edit your wiki page by now since this serves the main purpose of being filler text.

Here’s the code screenshot, complete with where I started typing my text:

Session 5 Handout is up

March 9th, 2009

Tonight we talk about Frankie Landau. Next time, Chains by Laurie Halse Anderson.

You can find the handout here.

And the winner of the best iPhone app is…

March 4th, 2009

iMario! Nicely done.

Tie-breaker: Best iPhone App

March 4th, 2009

Make your choice and click on “Submit” to break the tie. The last PhotoShop contest? Turn yourself into an anime character. Remember: lots of extreme colors and exaggerated features.

Voting is closed.